Saturday, December 22, 2012

"Life" on Canvas

So, it _finally_ snowed on Wednesday.

This has been a very mild Fall.  So, I haven't been messing around with inside projects too much.

But last night I did do a little implementation of the "game" Conway's Game of Life (http://en.wikipedia.org/wiki/Conway%27s_Game_of_Life) in JavaScript using the canvas tag.


It doesn't do much, it's randomly seeded and the edges aren't really handled properly.

If you click on the canvas, it will unleash a glider.  :)

You can zoom with ctrl+ and ctrl- (browser zoom).

Monday, March 19, 2012

My 2¢ on bcrypt vs ___

The topic came up today "Don't use bcrypt, use this instead".

http://www.unlimitednovelty.com/2012/03/dont-use-bcrypt.html

In my opinion, as a practical matter (and as a non-cryptographer), this conversation doesn't actually matter at all.

  1. Cryptographers (as a whole) rarely fully agree on anything anyway - this is no different.  
  2. No one is suggesting that bcrypt is fatally flawed, just that someone thinks there might be better options.
  3. "Use bcrypt" is perfectly good advice to give to people who were planning to:
    1. Use clear text
    2. Use ROT13 (2 rounds :) )
    3. Make up their own "crypto" (ROT13 then XOR with MAC address, etc)
    4. Use an unsalted hash
    5. Use crypt
    6. Encrypt passwords (versus hash)
    7. Use a salted hash with a globally shared salt
    8. Use a salted hash with individual salts
  4. "Use bcrypt" is still perfectly good advice even if PBKDF2 or scrypt are indeed better.
  5. bcrypt is (thankfully) becoming quite widely available.  And some people are even using it! :)

At the end of the day - you can modify your message to be, "Use bcrypt or scrypt or PBKDF2", if you really want.  But "Use bcrypt" is still perfectly valid advice.

Saturday, February 18, 2012

Tunneling MQTT over SSH

Tunnel image from http://www.imageafter.com/
One approach that can be used to secure protocols that do not have native encryption is to tunnel them over a known secure protocol.

This can be a VPN protocol like IPSec or it can be a secure general purpose protocol like HTTPS/TLS or SSH.

In this post, we will discuss tunneling MQTT over SSH in a simple and a more advanced configuration.

What is SSH?
SSH is a great protocol that is essentially a drop-in replace for many older, insecure protocols.

For example, SSH can(should) replace telnet, FTP, rlogin, rsh, rcp, etc, etc. It's like the secure Swiss Army knife of protocols.

Simple Configuration with Interactive Password
For the most basic implementation of SSH tunneling all you need is SSH installed on both devices.  The end with the service that you want to connect to must offer the SSH service and you need an SSH client on the end you wish to connect from.  You will also, obviously need an account on the server side.

Once you have this and have tested that the basic functionality works, we will need to set up the tunnel.  For this section we will assume that you are using the default ports for SSH (22) and MQTT (1883).  We will also need to select another port for the local tunnel endpoint - let's use 22883 (which is officially unassigned (IANA) yet, you should check your local machine first to make sure it is not in use (i.e., netstat -an)).

Now we need to enter only one command to set this up:

ssh -f -L 22883:127.0.0.1:1883 SSHusername@MQTT -N

'-f' means to fork into the background.
'-L' means to do a local tunnel.
'22883' is our local port number.
'127.0.0.1' is the destination host from the perspective of the tunnel destination.
'1883' is the MQTT port on the destination server.
'SSHusername' is the username that you use to login to the MQTT server's SSH service.
'MQTT' is the name or IP address of the MQTT server.
'-N' tells ssh not to run a command on the remote server.

You will be prompted for your password (for the SSH connection).

Now, if you connect to MQTT from this system using the localhost address and a port of 22883 like this:

mosquitto_sub -h 127.0.0.1 -p 22883 -u dan -P password -t 'test/#'

You will connect to the MQTT broker on your MQTT server - but this time over a secure (encrypted and authenticated) SSH connection.

The problem with what we have so far it that we need to be at the client to set up the tunnel - which is fine if it is our PC - but if it is a server, we probably need a solution that doesn't need an interactive password - but one that also does not sacrifice security.  This is what we will look at next.

Configuration to Support Key-based Authentication
SSH supports a wide variety of authentication natively and many more via the PAM (plugable authentication) interface.  We are going to enable the public/private key based authentication so that we can login to our MQTT server over SSH without providing a password - or leaving a password stored in plain-text.

Since our purpose here is to make this work in an unattended manner, we will not give a passphrase for our private key - keep in mind that this can lead to security problems - do not re-use this key for other purposes/servers and apply additional server side controls.

To generate our key, on the client side, run:

ssh-keygen

Then accept the defaults. If you want a passphrase - this would be the time to add one. Now run:

ssh-copy-id username@host

This copies your key into the .ssh/authorized_keys file.

If you didn't enter a passphrase - as I mentioned before - you'll want to provide additional security on the server side.

Some of those additional server-side controls might be to lock down what logins that use this key can do.  To do this, you can go to the server and edit the .ssh/authorized_keys file adding some options to the beginning of it:

from="192.168.1.*",no-pty,permitopen="127.0.0.1:1883",command="/bin/false" ssh-rsa AAAAB....


This limits logins to the 192.168.1.x network, declines to assign a pty, limits the forwarding to the localhost on the MQTT port, and runs the command "/bin/false" on login.  The point here being to lock down what the passwordless key can do to those things that you want that key to do anyway (no interactive logins, no sftp logins, no tunneling to other servers, no reusing the key on other servers, etc.   The ssh/sshd man pages have more information on other settings that may be useful for enhancing your security.

Once this is all done and you are satisfied with the security - just go back and run your ssh comand from above and you will not be prompted for a password (unless you set a key passphrase).  Now you should be able to use the tunnel as before, but with no password required.

Tuesday, February 7, 2012

Mosquitto on the PogoPlug

Pretend this is a Mosquitto...
Updated: Fixed the Makefile for the clients so they install to /usr.  Added links to the files and to the source package.

I got a PogoPlug this afternoon - the master plan being that all my gizmos talk to a broker on a low power computer of some sort - and this super cheap computer + an unused 8GB thumb drive seemed perfect.

The PogoPlug - in case you didn't click through - is a little linux computer intended to be "Your personal cloud" and allow you to share a USB drive via the Internet.  Which seems pretty cool.

For my purposes - it is a > $35 computer with 4 USB ports and Gig Ethernet.

So, after following these directions:  http://archlinuxarm.org/platforms/armv6/pogoplug-provideov3 and a couple issues (buggy udev and initscripts - a bit scary when ssh quit working a couple times*) I got ArchLinuxARM installed on this (a pretty well-paved path).

Next, I went looking for mosquitto for this in a "pacman" archive.  There was one there, but it was marked as "orphaned" (http://aur.archlinux.org/packages.php?ID=51571), so I updated this to install the bright and shiny 0.15 version that Roger just released the other day (http://mosquitto.org/download/).

Below are the files for this.  Keep in mind that I've never done this sort of packaging before - so be gentle. :)

They seem to work - at least they did for me - no guarantees though.  If you want to use them, copy them to a dir on your PogoPlug (assuming you have the dev environment installed already ('pacman -S kernel26-headers file base-devel abs python')), then as a non-root user, run 'makepkg -s' in the dir with these 2 files.  This will compile and build the pacman archive.  Then as root, run 'pacman -U mosquitto-0.15-1-arm.pkg.tar.xz' which will install this archive.

The benefits to installing like this is that you can now use pacman to manage (install, remove, etc) this package and don't end up with orphan files all over.

There is a repository for sharing this sort of thing at http://aur.archlinux.org/index.php - I haven't uploaded it yet - might be cool to have it up there though.

But it all works!  My Netduino is talking to Mosquitto on my PogoPlug!  :)

* If anyone wants to do this - let me know and I'll try to document the speed-bumps and the fixes.


# This is the PKGBUILD for mosquitto, an MQTT broker and example clients
# Maintainer: Gordon JC Pearce 
# Edits for 0.15 by Dan Anderson 
#

pkgname=mosquitto
pkgver=0.15
pkgrel=1
epoch=
pkgdesc="An MQTT broker and clients"
arch=(i686 x86_64 arm)
url="http://mosquitto.org/"
optdepends=('python: python support')
license=('BSD')
source=(http://mosquitto.org/files/source/$pkgname-$pkgver.tar.gz config.patch)
md5sums=('7ae0ac38f1f379578ab5530e5dc7269e'
         '2fd36955e7b5fe071e0a3e38e25ed46a')

build() {
  cd "$srcdir/$pkgname-$pkgver"
  patch -p1 < $srcdir/config.patch
  make
}

package() {
  cd "$srcdir/$pkgname-$pkgver"
  make DESTDIR="$pkgdir/" install
  install -Dm644 COPYING $pkgdir/usr/share/licenses/$pkgname/COPYING
}

# vim:set ts=2 sw=2 et:

And here is the config.patch file referenced above.


--- mosquitto-0.15/config.mk    2012-02-07 01:08:00.000000000 -0600
+++ mosquitto-0.15/config.mk.edit       2012-02-07 01:08:26.000000000 -0600
@@ -24,6 +24,6 @@ MSGMERGE=msgmerge
 MSGFMT=msgfmt
 DOCBOOK2MAN=docbook2man.pl

-prefix=/usr/local
+prefix=/usr
 mandir=${prefix}/share/man
 localedir=${prefix}/share/locale

--- mosquitto-0.15/client/Makefile      2012-02-05 03:13:24.000000000 -0600
+++ mosquitto-0.15/client/Makefile.edit 2012-02-07 22:54:00.000000000 -0600
@@ -2,7 +2,7 @@ CC=cc
 CFLAGS=-I../lib -Wall -ggdb
 LDFLAGS=-L../lib ../lib/libmosquitto.so.0
 INSTALL=install
-prefix=/usr/local
+prefix=/usr

 .PHONY: all install uninstall clean

Since copy/pasting these will mess with the md5 sums, here are links:
http://dananderson.us/pogo/PKGBUILD
http://dananderson.us/pogo/config.patch
Or both in a "source package"
http://dananderson.us/pogo/mosquitto-0.15-1.src.tar.gz
(Install with 'makepkg -s' then 'pacman -U mosquitto-0.15-1-arm.pkg.tar.xz')

I posted this to the AUR:  https://aur.archlinux.org/packages.php?ID=51571

Sunday, February 5, 2012

Review: "The IDA Pro Book: The Unofficial Guide to the World's Most Popular Disassembler" by Chris Eagle; No Starch Press

Review:  This is _the_ manual you need if you use IDA Pro for fun or profit.  It covers a wide range of information ranging from disassembly basics to writing plugins for IDA.  It provides sufficient detail without the tedious extraneous information you often have to dig through in technical books.

IDA is one of those tools that you can use for a long time and still miss a lot of the functionality that it has.  Chris does a masterful job of illuminating these features (as well as the pieces everyone uses) with good examples and an appropriate level of detail. 

There is a very well done map to this book in the "Introduction" before chapter one - this enables readers of any level of experience to focus.  But, I found that there was value to reading all of the sections anyway.

The accompanying website is well done and provides the examples, a small errata and additional references. (http://idabook.com)

This may go without saying, but you should have access to IDA PRO to get the full value from this book.  This edition is less applicable to the freeware version than the last edition was (although I'd still probably recommend it for anyone using IDA).

Bottom line:  If you use (or plan to use) IDA PRO - buy this book.

http://shop.oreilly.com/product/9781593272890.do

Disclosure: I was provided with a free PDF copy of this book by O'Reilly as a part of their "Blogger Review Program" program.  (http://www.oreillynet.com/oreilly/bloggers/)

Sunday, January 22, 2012

TMP36 Temperature Sensor

Before I got on a side-track on the MQTT project, I'd wanted to interface with a temperature sensor. The one I had originally chosen turned out to be a one-wire digital sensor.  This is probably a great sensor, but there are, as I understand now, some issues with the Netduino and one-wire sensors.  So, that sensor got sidelined until this support is fixed up and in non-beta firmware (or until I buy a FEZ Cobra - which would address several issues I'm facing - albeit with a significantly higher price tag.)

So, off I went to find a analog temperature sensor.  There are numerous options - I even briefly thought about drafting one of my MSP430's for this.  :)

But I settled for a TMP36 from Futurlec.  This (I mean 'these' - never only buy 1 of anything :) ) arrived on Friday after a trip from Hong Kong along with a bunch of random odds and ends that I'm tired of going to Radio Shack to get - 2 at a time (I'm ok with 100%+ markup to get it in town - but throw 10-20 into a bag, not 2).

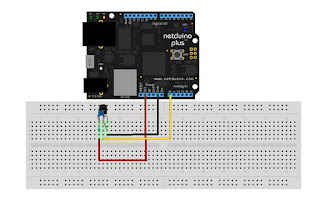
Between the datasheet (http://www.analog.com/static/imported-files/data_sheets/TMP35_36_37.pdf) and some help from the AdaFruit blog (http://www.ladyada.net/learn/sensors/tmp36.html) we got it working pretty well.


The cap is actually a normal orange ceramic disk - not sure why Fritzing doesn't have those.  It was added per the datasheet (0.1uF) for RFI purposes - but, in my non-scientific testing, it didn't make any difference if it was there or not (at least in my environment - which I'd figure is a mess RFI-wise).

I have several temperature sensors that I want to play with, so we made a class to hold those:


using System;
using System.Threading;
using Microsoft.SPOT;
using Microsoft.SPOT.Hardware;
using SecretLabs.NETMF.Hardware;

namespace Temperature_Sensors
{

    public static class TMP36
    {

        // port is analog port
        // sample is the number of samples to take
        // interval is the time (ms) to wait between samples
        // voltage is input voltage * 1000, default is 3.3v
        public static float getVoltage(AnalogInput port, int sample = 10, int interval = 100, int voltage = 3300)
        {
            int reading = 0;
            for (int i = 0; i < sample; i++)
            {
                Thread.Sleep(interval);
                // Read the value on the AIO port
                reading += port.Read();
            }
            reading /= sample;
            Debug.Print("Reading: " + reading + "");
            // Voltage at pin in milliVolts = (reading from ADC) * (3300/1024) http://www.ladyada.net/learn/sensors/tmp36.html
            return (reading * (voltage / 1024F));
        }

        public static float getCTemp(AnalogInput port, int sample = 10, int interval = 100, int voltage = 3300)
        {
            // Temp in °C = [(Vout in mV) - 500] / 10 http://www.ladyada.net/learn/sensors/tmp36.html
            return ((getVoltage(port, sample, interval, voltage) - 500F) / 10F);
        }

        public static float getFTemp(AnalogInput port, int sample = 10, int interval = 100, int voltage = 3300)
        {
            // Convert to °F 
            return ((getCTemp(port, sample, interval, voltage) * (9F / 5F)) + 32F);
        }
    }
}

And here is a program to drive this - with a timer being used to periodically collect the temperature:


using System;
using System.Net;
using System.Net.Sockets;
using System.Threading;
using Microsoft.SPOT;
using Microsoft.SPOT.Hardware;
using SecretLabs.NETMF.Hardware;
using SecretLabs.NETMF.Hardware.NetduinoPlus;
using Temperature_Sensors;

namespace myTempSensor
{
    public class Program
    {
        static AnalogInput analogInput;

        static void checkTemp(object o)
        {
            float fTemp = TMP36.getFTemp(analogInput, 10, 100, 3300);
            Debug.Print("Temp: " + fTemp + "");
        }

        public static void Main()
        {

            analogInput = new AnalogInput(Pins.GPIO_PIN_A0);
            Timer tempTimer = new Timer(new TimerCallback(checkTemp), null, 1000, 10000);

            // go to sleep until the timer wakes us (saves power)
            Thread.Sleep(Timeout.Infinite);
        }
    }
}


Right now we're not doing anything with this data - but soon we'll smoosh this up against the MQTT stuff and start getting this published - probably to the test.mosquitto.org server.

<aside>
Speaking of which - we might have to take another break and write some visualization stuff - Roger of Mosquitto fame has issued a challenge (http://mosquitto.org/2012/01/challenge-web-based-mqtt-graphing/) for visualization of some energy data that is being fed to his server.  This might be fun.  I'm thinking of using the Node.js client then feeding that data into the Google charts API.
</aside>

Anyway, I haven't got this sensor to be particularly accurate yet.  Although, forcing my math to floating point math REALLY helped.  :)  I may just try a thermistor.  Not sure, I'm sure that a digital sensor is probably the right plan...  I think my main problem at this point is the accuracy of the sensor (+-2C), mixed with the stated "non-high precision" of the Netduino ADC's.  So, this combination seems to be about as accurate as that of my other "high precision" thermometer.  :)


Since the accuracy is odd - I added the ability to collect a bunch of readings and average them.  Not sure it really helped as much as I would have expected either, but it's there.

I think next up is going to be a Syslog library for the Netduino - which will require an NTP library since I don't have an RTC board handy and you need time for logs.  (FEZ Cobra has one though I think....Which might be a better approach than buying a mini-board...  I don't know...  I could do SSL with the Cobra too...)

And we'll keep working on the MQTT stuff.  Still need a couple message handlers and to redo some stuff related to the fixed headers.

Also, kind of seriously thinking about writing an MQTT-S gateway (forwarder?) and client for the Netduino Plus - then getting some sort of comm stuff to talk between a few things around here.  I'm kind of taking that "no publicly available implementation" bit as a challenge...  :)


Tuesday, January 17, 2012

Project updates - 16 Jan

Over the last week or so, we've had some fun and made some progress on a couple projects.

Last week we went to the Omaha Maker's Group meeting.  This was our first trip down there.  It's a nice location full of neat projects and interesting people.  We watched a fun presentation on an attempt at a high-altitude rocket build and launch.  The kids have been asking when the next one is scheduled for.  :)

Speaking of the OMG, we're going there on the 7th of Feb to demo our little robot and maybe a couple other Netduino projects (maybe HID and MQTT).

On the robot front, we got our new IR sensor in the other day.  Tonight Steven got the new sensor installed and then I added some button support (on/off) and re-calibrated the code for the new sensor (a bit more near-sighted (our choice) than the last one we used).  I then did a brief write-up on how everything works and a pin-out chart in case something happens in-route - because he's taking the robot to school to show his in-school robotics class!


On the MQTT front, I got the publishing bit all done and am now in the process of adding subscription support.  I really need to get this completed in the next couple of days, because I have a NeTV en-route to me and I know as soon as I get that - I'll be up all night fooling with that instead of MQTT.  :)

We ran to Harbor Freight this weekend and got our free screw-driver set plus picked up a $8 rotary tool and a couple bins for when my Futurlec order gets here.

Finally, we've got Valentine's Projects to get to work on as soon as the parts for them arrive.  I need to find a place in town that can do plastic work - we could use some cut plastic sheet to dress our projects up a bit...

I have so many projects going on - we'd better get some snow soon.  :)

But that's it for us, for now.

Monday, January 2, 2012

Half-Baked MQTT Publisher for Netduino Plus

UPDATE:  This has been moved to GitHub: https://github.com/danielan/NetduinoMQTT

I received a Netduino Plus for Christmas this year. So, I needed a project to put this to work. After working my way through the O'Reilly/Make book, "Getting Started with the Internet of Things" book, I decided to implement a MQTT publisher for my Netduino Plus.

Now, MQTT is a really cool protocol that can be used for all sorts of things and supports all sorts of neat features.  This isn't that sort of program.  :)

All this does, in a weak way, is connect to a message broker, publish a message without QoS and then disconnect.  This is NOT how you should do it.  This doesn't work for long topics, long messages, etc.  It doesn't retry if there is a problem, etc.

This is intended only for my use - ultimately publishing a temperature from a sensor over and over - but I'm back to work tomorrow, so this will probably be idle for some time.

I hope this helps - but don't use it expecting it to be useful without more work. 

So, enough disclaimers... :)

MQTT

I learned of MQTT from this post at AdaFruit: http://www.adafruit.com/blog/2011/11/08/ibm-open-sources-potential-internet-of-things-protocol/

And the learned more from this Series on "ReadWriteWeb":
http://www.readwriteweb.com/hack/2011/11/ibms-andy-piper-negotiating-th.php
http://www.readwriteweb.com/hack/2011/11/ibms-andy-piper-part-2-how-mqt.php
http://www.readwriteweb.com/hack/2011/11/ibms-andy-piper-part-3-the-tax.php

There's also a web site at: http://mqtt.org/

And the quite useful official specification is over here: http://public.dhe.ibm.com/software/dw/webservices/ws-mqtt/mqtt-v3r1.html

Demoing MQTT

To use MQTT you need a "Broker" - I used "Really Small Message Broker" from here: https://www.ibm.com/developerworks/community/groups/service/html/communityview?communityUuid=d5bedadd-e46f-4c97-af89-22d65ffee070

To demo this, download rsmb from there and unzip it.  Then open 4 "cmd" windows and make your working directory in the folder "windows" (assuming Windows) in the rsmb directory you just extracted.

In one cmd window run: broker.exe

In the next cmd window run: stdinpub.exe test
In another cmd window run: stdoutsub.exe test --clientid one
In the last cmd window run: stdoutsub.exe test --clientid two

"test" is the name of our topic. The client ids are necessary because, I assume, there is a bug in the windows stdoutsub.exe binary - the names are supposed to be unique by default*, but aren't.

* "Help" for stdoutsub.exe: "--clientid <clientid> (default is hostname+timestamp)"  But in reality they seem to default to "stdout-subscriber" - I'll see if I can find someone to report this to.

Now, if you type something into the stdinpub.exe window - you should see it show up in the two stdoutsub.exe windows.  This is, simplistically, what MQTT is for (lightweight publisher/subscriber model comms).

(These windows will also be useful to see if our program is working.)

The Code

There's a library available for MQTT on all sorts of languages and software, but I couldn't find anything for the Netduino Plus (although maybe the .NET one would work?)

It would probably be a good idea to read through the standard first.  I used hex for flags and numbers where they made more sense.  I started to do constants, but didn't get finished yet...

(Note - the flags are easier to decipher if you remember that for hex you use 4 bits per hex digit.)

While keeping in mind that this is not appropriate for actual use....

Here is the code for the "library".

using System;
using System.Net;
using System.Net.Sockets;
using System.Text;
using Microsoft.SPOT;
using Socket = System.Net.Sockets.Socket;

namespace Netduino_MQTT_Client_Library
{
    static class Constants
    {
        public const int MQTTVERSION = 3;
    }

    public static class MQTTClient
    {
        // From Sample Code (SockClient.cs) Copyright Microsoft
        public static Socket ConnectSocket(String server, Int32 port)
        {
            // Get server's IP address.
            IPHostEntry hostEntry = Dns.GetHostEntry(server);

            // Create socket and connect to the server's IP address and port
            Socket socket = new Socket(AddressFamily.InterNetwork,
                SocketType.Stream, ProtocolType.Tcp);
            socket.Connect(new IPEndPoint(hostEntry.AddressList[0], port));
            return socket;
        }
        // End of Microsoft Copyright sample code

        public static void ConnectMQTT(Socket mySocket, String clientID)
        {

            int index=0;
            byte[] buffer = null;
            buffer = new byte[16 + clientID.Length];
            // Fixed Header (2.1)
            buffer[index++] = 0x10; // Fixed header flags
            buffer[index++] = (byte)(14 + clientID.Length); // Remaining Length
            // End Fixed Header
            // Connect (3.1) 
            // Protocol Name
            buffer[index++] = 0;       // String (MQIsdp) Length MSB
            buffer[index++] = 6;       // Length LSB
            buffer[index++] = (byte)'M';  // M
            buffer[index++] = (byte)'Q';  // Q
            buffer[index++] = (byte)'I';  // I
            buffer[index++] = (byte)'s';  // s
            buffer[index++] = (byte)'d';  // d
            buffer[index++] = (byte)'p';  // p
            // Protocol Version
            buffer[index++] = Constants.MQTTVERSION;
            // Connect Flags
            buffer[index++] = 0x02;
            //Keep alive (20 seconds)
            buffer[index++] = 0;     // Keep Alive MSB
            buffer[index++] = 20;    // Keep Alive LSB
            // ClientID
            buffer[index++] = 0;                        // Length MSB
            buffer[index++] = (byte)clientID.Length;    // Length LSB
            for (var i = 0; i < clientID.Length; i++) 
            {
                buffer[index++] = (byte)clientID[i]; 
            }
            mySocket.Send(buffer, index, 0);

        }

        public static void PublishMQTT(Socket mySocket, String topic, String message)
        {

            int index = 0;
            byte[] buffer = null;
            buffer = new byte[4 + topic.Length + message.Length];
            // Fixed header
            //      Publish (3.3) fixed header flags
            buffer[index++] = 0x30;
            //      Remaining Length (variable header + payload)
            buffer[index++] = (byte)(2 + topic.Length + message.Length);
            // End of fixed header 
            // Variable header (topic)
            buffer[index++] = 0;                   // Length MSB
            buffer[index++] = (byte)topic.Length;  // Length LSB
            // End of variable header
            for (var i = 0; i < topic.Length; i++)
            {
                buffer[index++] = (byte)topic[i];
            }
            // Message (Length is accounted for in the fixed header)
            for (var i = 0; i < message.Length; i++)
            {
                buffer[index++] = (byte)message[i];
            }
            mySocket.Send(buffer, buffer.Length, 0);
        }

        public static void DisconnectMQTT(Socket mySocket)
        {
            byte[] buffer = null;
            buffer = new byte[2];
            buffer[0] = 0xe0;
            buffer[1] = 0x00;
            mySocket.Send(buffer, buffer.Length, 0);
        }
    }
}

Here is the code to use this library (Don't forget to change to your IP (where broker.exe is running)).


using System;
using System.Net;
using System.Net.Sockets;
using System.Threading;
using Microsoft.SPOT;
using Microsoft.SPOT.Hardware;
using SecretLabs.NETMF.Hardware;
using SecretLabs.NETMF.Hardware.NetduinoPlus;
using Netduino_MQTT_Client_Library;

namespace NetduinoMQTT
{
    public class Program
    {
        public static void Main()
        {
            // This is where you would do your work
            Socket mySocket = MQTTClient.ConnectSocket("192.168.1.1",1883);
            MQTTClient.ConnectMQTT(mySocket,"tester123");
            MQTTClient.PublishMQTT(mySocket, "test", "testme12");
            Thread.Sleep(1000);
            MQTTClient.DisconnectMQTT(mySocket);
        }
    }
}

Deploy this to your Netduino Plus and you should see the message, "testme12" appear in your stdoutsub.exe windows (and some connection messages in your broker.exe window).


To Do

If you wanted to use this for anything, probably at a minimum you should account for connect failures, longer topics, longer messages, maybe QoS, maybe authentication, maybe use the SSL version, etc.  Since it is a "library" it would be good to support the whole subscription thing, etc.

Conclusion

So, that's it!  VERY simplistic MQTT publishing from a Netduino Plus to RSMB.  When I get around to setting up my temperature sensor maybe I'll make this a bit more robust and re-visit this.

I hope you enjoyed this post.